Service Center |
The Service Center is a service oriented operational place where users can monitor the service activity and perform daily operational work from a central location through the Service Snapshot. By utilizing multiple Profiles, the service center can provide an overview of the current business operations by a variety of specified criteria for the need at hand.
Service Center uses Generic Container Inventory by Container Type utilized in the Container Availability Calendar. Container Locations can be accessed through the service center Container Mapping and provides a simple view of container location. Container Pushpins can be setup by inactive days to show the status of a container and the location based on the pushpin on the map.
Generic Inventory is used for calculating the bin availability without having to use container inventory. Utilizing the container type, service type and a service size cross reference, TRUX will know how many bins are available based on the number of active services.
Users will add the container inventory by container type and define the applicable service types, size & quantity with the option to include images and notes. Also see Logged Activities.
Navigate To: System>Configuration>Code Table>Containers>Container Types

- Click Add.
- Enter a unique 2-digit Code and Description.
- Select Unit of Measure.
- Select the Applicable Service Types.
- Service Types can only be applied to one Container Type.
- Enter Inventory Size and Quantity in the Inventory grid.
- Optional Image and Note can be applied to each line item.
- Container Inventory can be modified as bins are purchase and removed from the company inventory.
- Save.
Logging for the Generic Container Inventory will be included in the new Log Type: Generic Container Inventory Update.
Navigate To: Report>Report Center>System>Logged Activities
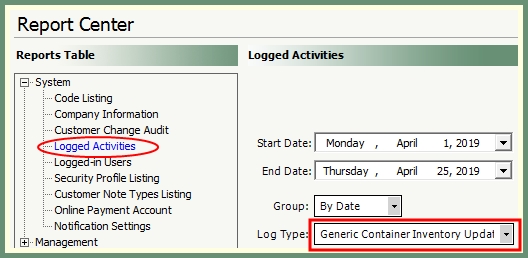
- Select Start and End Date.
- Select Group or leave as default By Date.
- Select Log Type: Generic Inventory Update.
- Grid will populate with results.
- Select an output to generate a report.
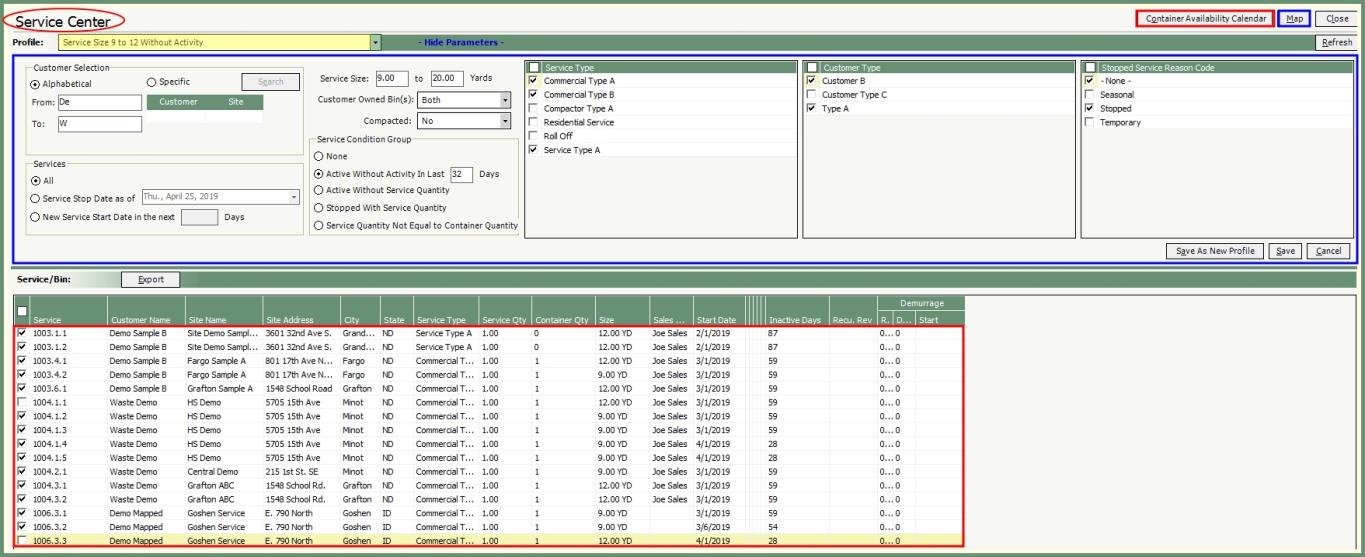
Service Center will display service details as per user defined Profiles. As many Profiles as needed can be defined . Service Center offers a Container Availability Calendar, Map and the Export of the service profile results.
Navigate To: Routing>Service Center
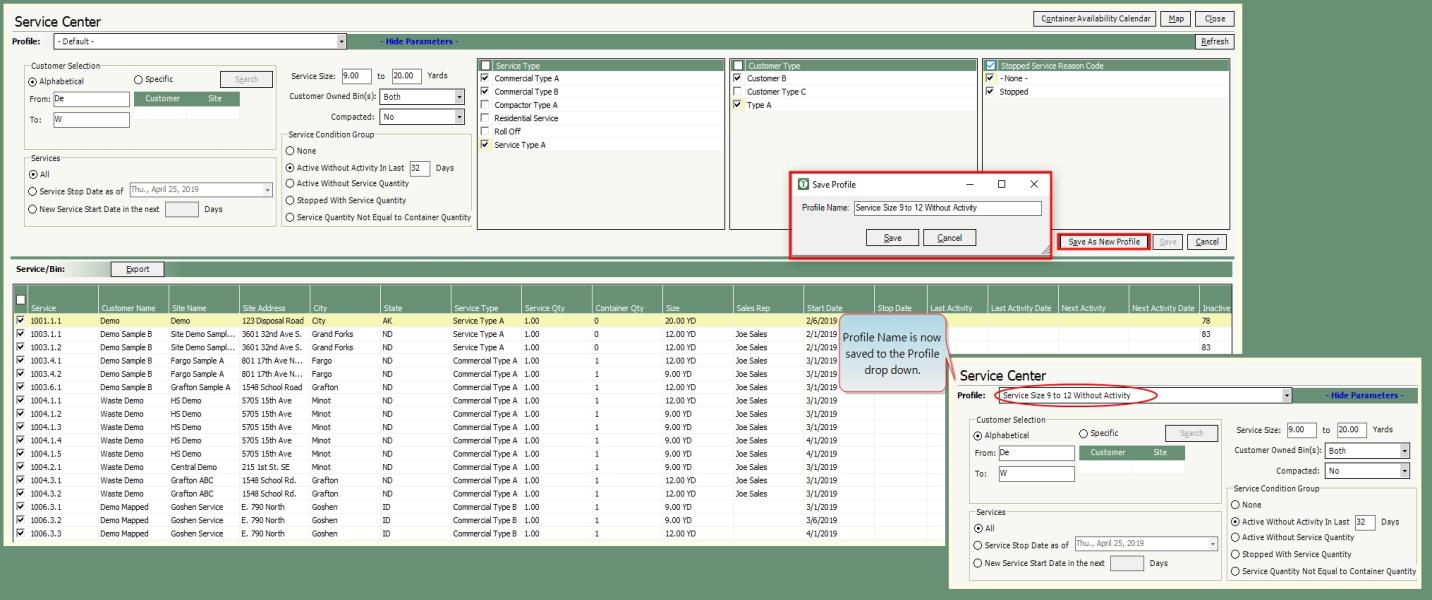
- Customer Selection. All will be included by default or the customers can be selected in an Alphabetical range or individually by selecting Specific.
- Services. All will be included by default or can be sorted by Service Stop Dates (select date from calendar) or New Services Started within the next ___ (enter number of) Days.
- Service Size. Enter the Service Sizes to be included from and to. Only services within these service sizes will be included.
- Customer Owned. Select Both, Yes or No.
- Compacted. Select Both, Yes or No.
- Service Conditions Group. None will include all conditions or select a specific criteria of Active Without Activity in the Last ____ Days, Active Without Service Quantity, Stopped With Service Quantity or Service Quantity Not Equal to Container Quantity.
- Service Type. All will be included by default or can be specified in the grid.
- Customer Type. All will be included by default or can be specified in the grid.
- Stopped Service Reason Code. All will be included by default including stopped services without a reason code or can be specified in the grid.
- Click Refresh. The Service/Bin will populate the grid based on the selected criteria.
- Review the results and make changes if necessary.
- To expand the grid view, click Hide Parameters.
- To reduce the grid view, click Show Parameters to return to the Profile selections.
- Click Save as New Profile. Enter Profile Name. The new profile will be added to the drop down.
An existing Service Center Profile can be modified and saved as the current profile or modified and saved as a new profile.
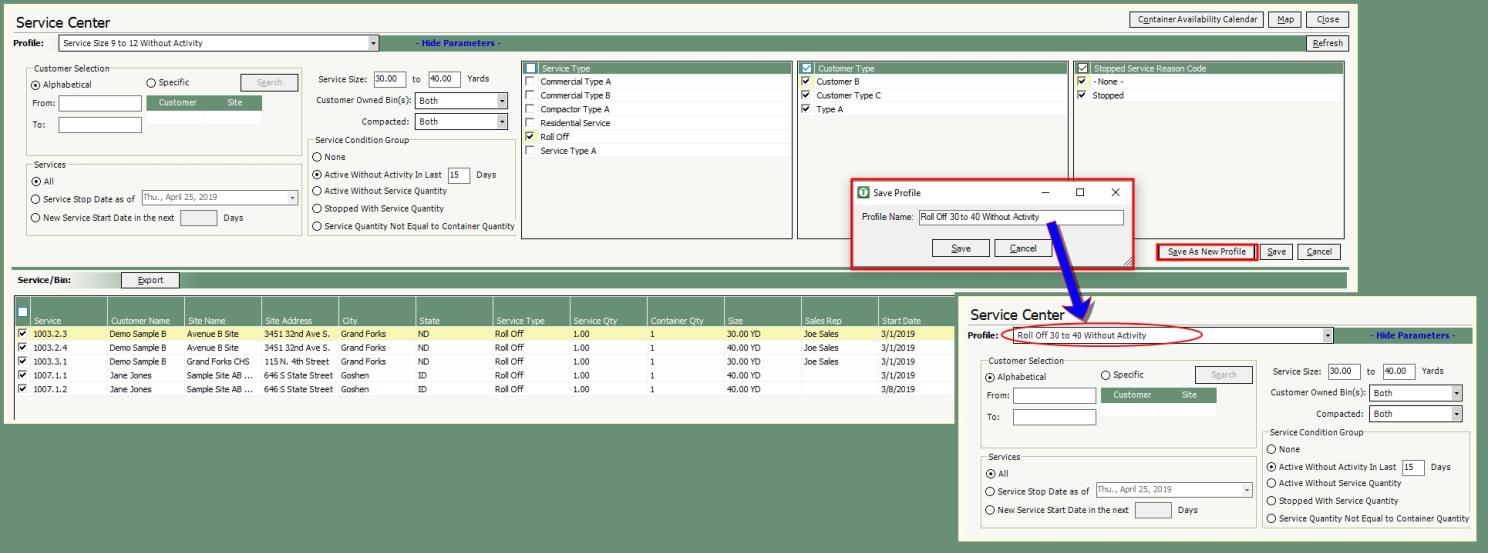
- Recall a Profile from the drop down.
- Make changes as needed to any parameter fields.
- Click Save to save the Current Profile.
- Click Save As New Profile to save these changes as a New Profile.
- New Profile will be added to the Profile drop down.
With results populated in the Service/Bin grid; the displayed results can be sorted, re-sized, exported as an excel worksheet and allow access to multiple right click functions to each service level line item.
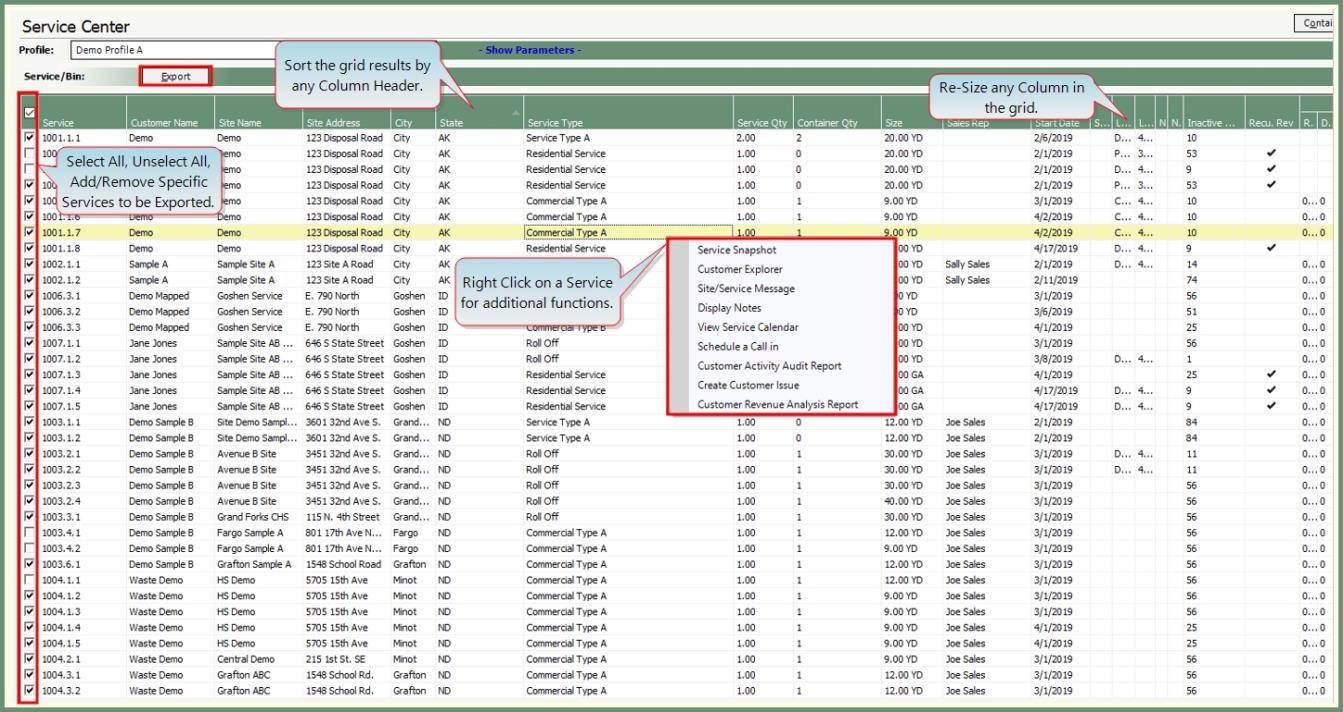
Sort: Click on any column header to sort the grid by the content of that column in ascending or descending order. Click once for ascending and click twice for descending.
Re-Size: Each column can be expanded or reduced by clicking on a Column Header Margin to the desired size.
- The sorted and re-sized grid can be Saved in the Profile Parameters.
Export: All results in the grid will be selected by default. Click the selector box to unselect all, select all and add/remove specific services. Click Export to send the results to an excel worksheet.
Additional Functions: Right Click on a service in the grid to view/perform any of the available functions.
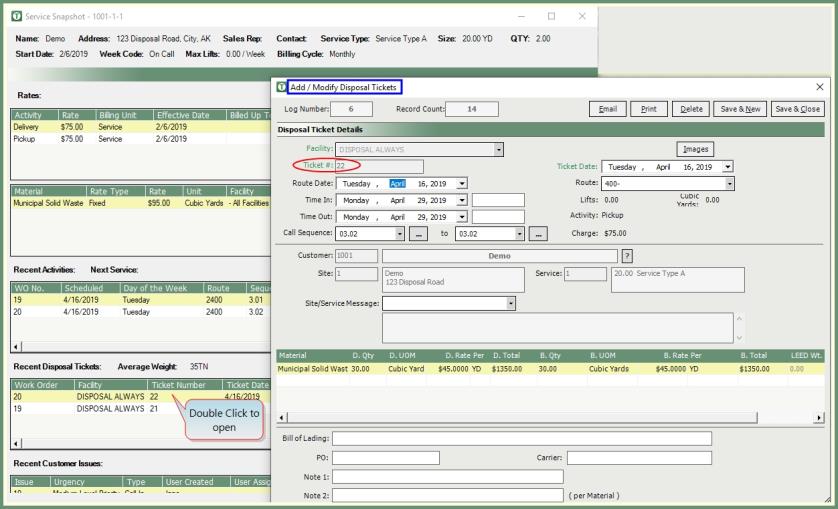
The Service Snapshot will provide all of the most recent information for the selected service by right or double clicking on a service in the grid. Service Snapshot allows for a quick option to Add Activity, Add Material Rate and Manage Containers.
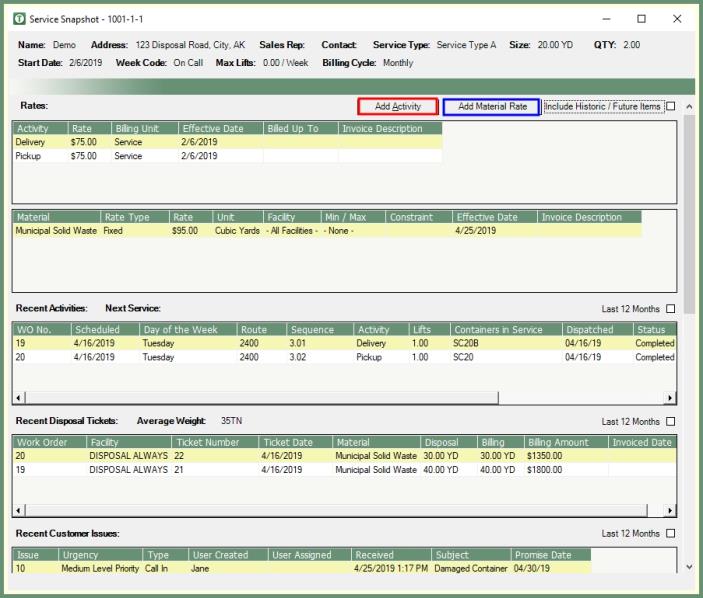
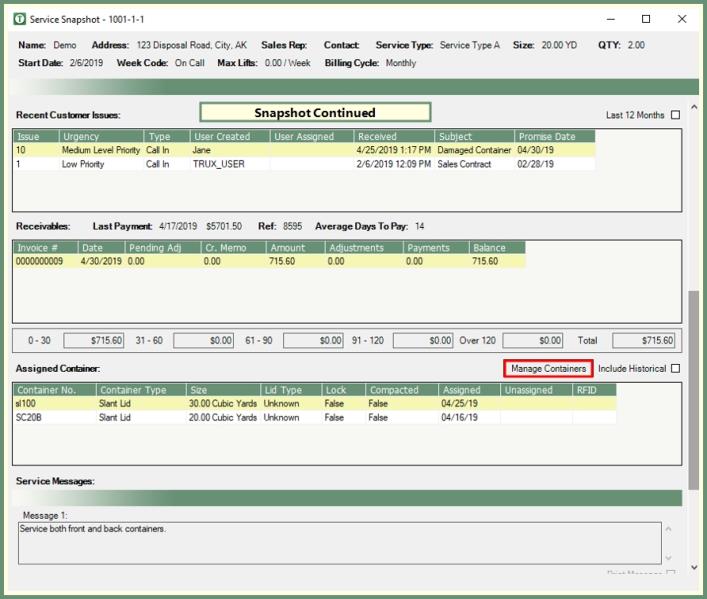
- Double Click on a service in the Service Center grid to open the Service Snapshot.
- The five most recent items will display in the snap shot grid sections.
- Add Activity, Add Material Rate and Manage Containers can be done directly from the Service Snapshot by clicking on the available button above the Rates or Assigned Container sections.
- Double Click on any grid section line item to open. For instance, Double Click to open a Recent Disposal Ticket in
- If the Site or Service contains a Pop-Up Message, the Pop-Up Message will be presented when the Service Snapshot is opened.
- Suspended and Stopped Services will be indicated at the top in blue or red and include the .
Container Availability Calendar
The container availability calendar is used to show container inventory on each date based on the selected year and month by container type and size. Inventory Detail and Schedule Call In functions are also provided from the calendar.
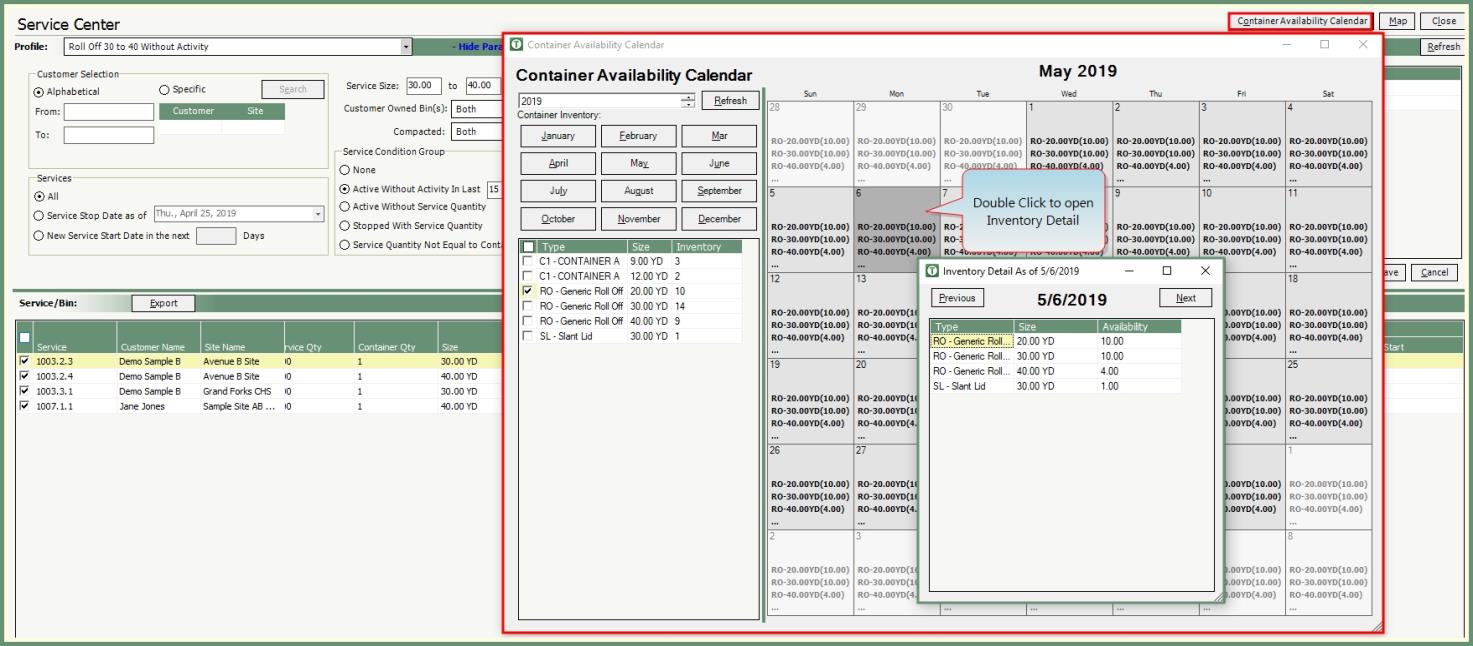
- Click the Container Availability Calendar.
- Current Year will default. Modify year if needed.
- Current Month will default. Click a month to change the month view.
- The inventory will recalculate and show updated bin availability information on each date when months are changed.
- Select Container Type to view from the grid.
- The grid will show the total number of bins by container type and size. The inventory column displays the inventory number not available bin count.
- The calendar will populate based with the available containers.
- Double click on a day in the calendar to view the Inventory Detail.
- Right Click on a calendar date to view .
- Click Previous or Next to view the previous or next day.
- The left side will show the total number of bins by container type and size at each yard. The number is the inventory number, not available bin count. The default is not-checked for all of the check-boxes. Allow user to check one or multiple check box to show the availability of the bins on the calendar.
- Each date on the calendar will show the number of available bins. When a user changes to another month, the system will recalculate and show the updated bin availability information on each date.
- As containers are delivered/exchanged/returned, the availability count will be adjusted once the calls are completed.
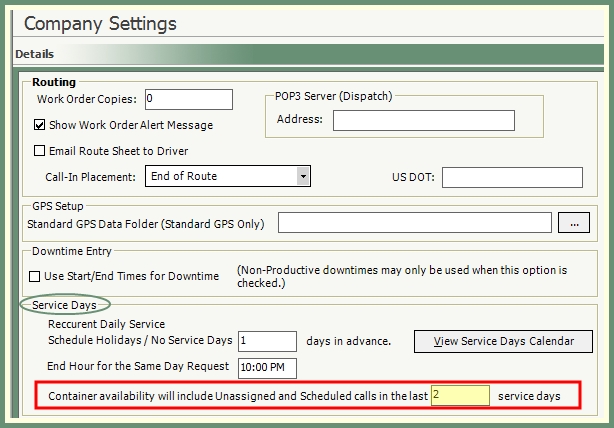
- To account for container availability on unassigned and scheduled calls not yet completed; see .
The Map button will show the container location. Each container location can display the service details and inactive days by clicking on the pin. The Setup within Container Mapping allows for the customization of pin display by inactive days.
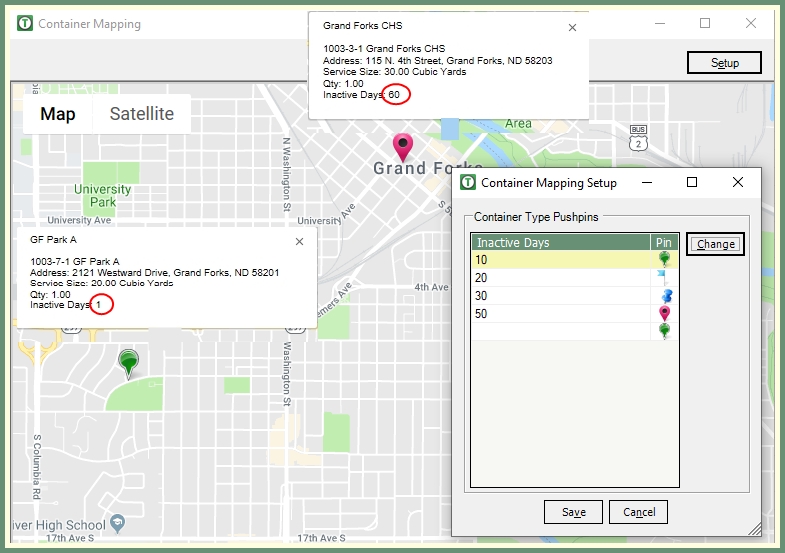
- Click Map.
- Pins for each service with container locations will display on the map.
- Click a pin to display the service details, quantity and inactive days.
Change the Pushpins for container type by inactive days. Pushpins are company and user specific.
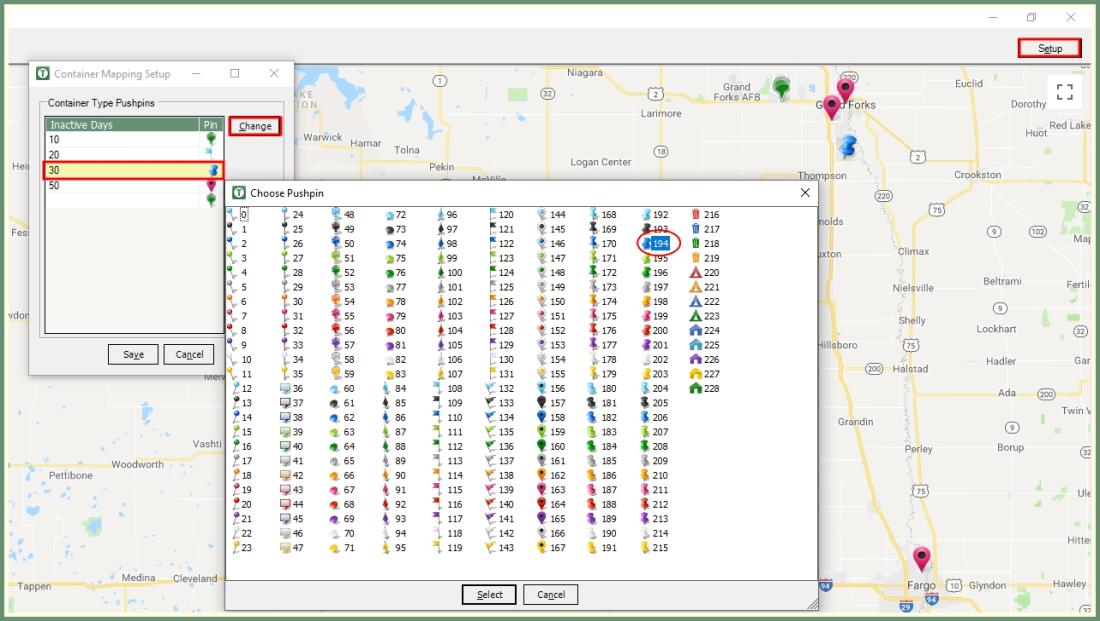
- With the map open, click Setup.
- Enter the Inactive Days.
- The default pin will be in the Pin column. Highlight the row in the grid and click Change.
- The Pushpin selector window will open.
- Double Click to select a Pushpin.
- Repeat for as many Inactive Day Pushpins as needed.
- Click Save.
Note: Multiple containers in the same location will display the pushpin for the longest inactive days.

